International Address API Quick Start
This quick start guide will walk you through making your first request to the International Address API, create a basic proxy script, and use our Javascript library.
We also have ready-to-use plugins for webshop software such as Magento or WooCommerce.
Create an account
If you don't have an account already, create one and follow the account registration steps.
Obtain API credentials
After completing the account registration, you'll immediately have access to the API for testing and development.
You should have received an email with the credentials for your account.
Log in to Application Management, navigate to your credentials overview and hit "Create credentials". On the next page, submit the form to receive a new key and secret by email.
Make an API request
With your credentials you can now make a first request to the API.
Let's use cURL to make a single request to the API. Run the following command in your terminal:
cURL
# Use jq to format the JSON output (https://stedolan.github.io/jq).

curl --user YOUR_KEY -H 'X-Autocomplete-Session: curl-example' https://api.postcode.eu/international/v1/autocomplete/nld/2012ES30 | jq
Enter your secret when asked for the host password.
You should now get the JSON response for this request:
JSON
{
  "matches": [
    {
      "value": "2012ES Haarlem, Julianastraat 30 ",
      "label": "2012ES Haarlem, Julianastraat 30",
      "description": "",
      "precision": "Address",
      "context": "nld6SVBbpsirx8iwh5UpWjTNJ7ePa68cklh2tcKIXocbwY7r6irt7Syzr9EbFeb8aZZuAO52ENHZn8cghsxDDwYblZwWwqHzEAD9DQolBKEzC5UJxUdSSjABKrgvqf7DH3gK7M368vEcbZTomo8iC",
      "highlights": [
        [
          0,
          6
        ],
        [
          30,
          32
        ]
      ]
    }
  ]
}
Add address autocomplete functionality to a text input
You'll need a webserver and PHP to run this example. All files are placed in the same directory on the webserver.
Let's start by creating a proxy script. This script will take care of authentication of your API account.
Create a new file called proxy.php in your text editor and add the following:
PHP
<?php
const API_KEY = 'lB7Uo...beCSNy'; // Replace with your API key.
const API_SECRET = 'gv9Zk...mvQue'; // Replace with your API secret.
const API_URL = 'https://api.postcode.eu/international/v1/';

// We recommend formatting your proxy URL's (e.g. https://example.com/autocomplete/{context}/{term}).
// But since that is beyond the scope of this example, we'll use GET parameters.
if (isset($_GET['method']) && in_array($_GET['method'], ['autocomplete', 'getDetails']))
{
	if ($_GET['method'] == 'autocomplete' && isset($_GET['context'], $_GET['term']))
	{
		$url = API_URL . 'autocomplete/' . rawurlencode($_GET['context']) . '/' . rawurlencode($_GET['term']);
	}
	else if (isset($_GET['address']))
	{
		$url = API_URL . 'address' .  $_GET['address'];
	}

	if (isset($url))
	{
		// Initialize a cURL session
		$client = curl_init($url);

		// Our Javascript library has already set the required "X-Autocomplete-Session" header.
		// Pass it on to the API.
		curl_setopt($client, CURLOPT_HTTPHEADER, ['X-Autocomplete-Session: ' . $_SERVER['HTTP_X_AUTOCOMPLETE_SESSION']]);

		// Authenticate with key and secret.
		curl_setopt($client, CURLOPT_USERPWD, API_KEY . ':' . API_SECRET);

		// Make the request and output the result.
		curl_exec($client);

		// Close the cURL session and exit.
		curl_close($client);
		exit();
	}
}

// Repond with HTTP error 400 to anything else.
http_response_code(400); // Bad request
Make sure to replace the values of the API_KEY and API_SECRET constants with your key and secret.
Next, create an HTML page with a text field for address input and an element to display the address result in. Add the following content to index.html:
HTML
<!DOCTYPE HTML>
<html lang="en">
	<head>
	</head>
	<body>
		<h1>Autocomplete example</h1>

		<input type="text" placeholder="Find your address..." id="address-query">

		<address id="address-result"></address>
	</body>
</html>
Download our Javascript library and accompanying stylesheet, AutocompleteAddress.js and autocomplete-address.css, and include the files like this:
HTML
<head>
	<link rel="stylesheet" href="autocomplete-address.css">
</head>
<body>
	<!-- body content -->
	<script src="AutocompleteAddress.js"></script>
</body>
Then create a new file called script.js and add the following Javascript:
Javascript
document.addEventListener('DOMContentLoaded', function () {
	const queryElement = document.getElementById('address-query'),
		resultElement = document.getElementById('address-result');

	// Create an autocomplete instance.
	const autocomplete = new PostcodeNl.AutocompleteAddress(queryElement, {
		// Configure proxy URLs.
		autocompleteUrl: 'proxy.php?method=autocomplete&context=',
		addressDetailsUrl: 'proxy.php?method=getDetails&address=',
	});

	// The getSuggestions() method needs some modification to use GET parameters.
	// Fortunately, it is easy to overwrite autocomplete methods.
	autocomplete.getSuggestions = function (context, term, response)
	{
		let url = this.options.autocompleteUrl + encodeURIComponent(context) + '&term=' + encodeURIComponent(term);
		return autocomplete.xhrGet(url, response);
	}

	// Add an event handler to show the selected address.
	queryElement.addEventListener('autocomplete-select', function (e) {
		if (e.detail.precision === 'Address')
		{
			autocomplete.getDetails(e.detail.context, function (result) {
				resultElement.innerHTML = result.mailLines.join('<br>');
			});
		}
	});
});
And include this file as well:
HTML
<body>
	<!-- body content -->
	<script src="AutocompleteAddress.js"></script>
	<script src="script.js"></script>
</body>
Lastly, add some basic styles. Create a file called style.css and add:
CSS
body {
	padding: 50px;
	text-align: center;
	font-size: 20px;
}

#address-query {
	padding: 20px;
	width: 420px;
	font-size: inherit;
	border: 2px solid #ccc;
}

#address-result {
	padding: 30px;
}
Include this stylesheet in the head element:
HTML
<head>
	<link rel="stylesheet" href="autocomplete-address.css">
	<link rel="stylesheet" href="style.css">
</head>
Result
Done! You are ready to view the result. If you view the example in your browser it should look like this:
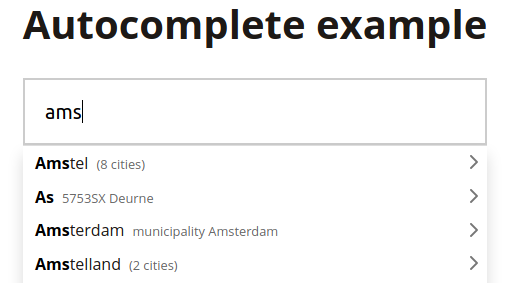
As a next step, configure a different country to search in. Take a look at the context option and setCountry method.